AMERICA!
Happy Independence Day ya'll! We are spending the day harvesting red, white, and blue potatoes for our Wednesday CSA pick-up, adding supers to the busy bee hives, and eating every slice of the apple pie that I made last night. It was my first try with apple pie, and I am pretty pleased with how it turned out! I have been obsessing lately over Jesse's copy of Williams-Sonoma Essentials of Baking....it is ridiculously fancy and over the top and I never follow the recipes (orange zest doesn't grow in our garden), but the instructions for basics like bread kneading and proofing and pie crusts are so helpful.I am not sure what we will do with our evening, as fireworks are pretty much out of the question around these parts ("explosive fire conditions"). What are you doing for the Fourth?- Hannah.
FERMENTATION LOVE.
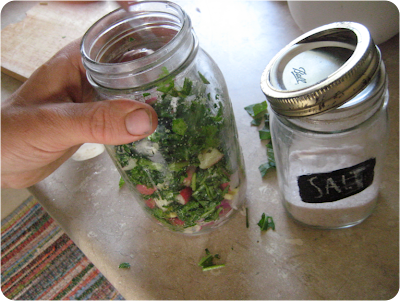
Recently, Jesse received a package in the mail and I haven’t seen him since. Just kidding (...kind of). The Art of Fermentation is Sandor Katz’s newest book, and Jesse is a little bit obsessed. Sandor is becoming our go-to fermentation guru, also the author of Wild Fermentation and The Revolution Will Not Be Microwaved. I have been informed that we will be having lots of bubbling crocks and pickling concoctions crowding our kitchen this year as Jesse tries some of Sandor’s recipes. The first experiment is underway: fermented radishes and ginger. We will let you know how it turns out!- Hannah.
INTRODUCING: THE RECIPE TAB.
Lambsquarters is the type of vegetable primed to garner a few question marks on the brows of your patrons––then radishes, then swiss chard––but these are foods we love and foods we want to share with our shareholders and friends––the garden seems to like em' as well! Anyway, with each one of our baskets we're going to be adding recipes to the blog under our brand new RECIPE tab. Each week we'll add more recipes, and every year we'll add to those until we have infinity (rough estimate). We hope to accumulate more and more recipes through our own experiments and through the shared experiments of our shareholders, so there will always be new ideas to cook the things we grow and our shareholders will never be able to feel discouraged. We have loved hearing from you about what you are cooking this week with your shares! So keep sending us your ideas from this week, or any week.... we'd love to add them to the blog!Here is one you'll find under "radishes" that we tried this past week. It was amazing! Enjoy!Wilted Greens Salad and Radishes..serves two..3 small radishes and greens1 t vinegar (apple cider or champagne preferably)several leaves lambsquarters1/2 bunch kale1/2 bunch swiss Chard1/4 stick butter (or cook diced bacon and keep both bacon and fat)2 eggs1/2 cup walnutsDice radishes small, put in cup and add vinegar––stir and let sit. Toast walnuts in oven. Heat butter on med-low heat in large sauté pan. Chop and add lambsquarters, kale, radish greens and chard to melting butter and stir for a couple minutes or until tender––if they're getting crispy it's too hot/not enough butter. Pour radishes over greens and cook for one minute. Stir in walnuts and put on plate. Fry or poach eggs and place overtop. Serve with garlic bread. You can also add cheese over the eggs––parmigiano preferably––or more greens as you please.
EASY HOMEMADE WINE RECIPE.
 Making wine is simple––it happens naturally. When fruit falls to the ground and rots, that's what's happening, wine is happening. Making wine is simple because wine makes itself, you just need to give it a proper venue.https://www.youtube.com/watch?v=5RPGQc1AMR4what you'll need:
-Makes 4 bottles-
- A 1 1/2 –– 2 gallon crock or glass jar
- A 1 gallon carboy or small-necked glass container
- An airlock or balloon
- Fruit, preferably unwashed berries or grapes, but you can use anything (really)
- A few cups of honey
- Filtered water, non-chlorinated water (spring water works best)
- Long, thin plastic tube to siphon wine from carboy to bottle
- Used, clean bottles with corks/screw caps
I recommend foraging or picking your berries if possible, but either way, make sure they are not sprayed with anything or washed if you can help it––they house your yeasts. Keep in mind throughout, ingredients in winemaking, as it is with cooking, are essential to making good wine. This includes the fruit obviously, but the water and honey if you use any.Try and fill the crock near full with the fruit and massage the juice out of it––squeeze it for 5 or so minutes.Leave at least 1 1/2 inches between the top of the liquid and the top of the jar. When it starts fermenting it will rise a bit, so heed the last sentence to avoid overflow. If you do not have enough fruit to get to the top of the jar, don’t sweat it. Add a little water to make up for it––and no, this will not ruin your wine. It might make it a little lighter, but you wont regret that in the summertime. The goal is to make a gallon of liquid to put in the carboy. Eye it as best you can.Once the liquid is in place, stir in 2-3 cups of honey.(This is indeed imprecise, but if we’re trying to keep things easy, you’re going to have to make some guesses and learn by trial and error unless you want to buy a refractometer. I don’t own one, I might never, and most of my wines turn out great. If you added a lot of fruit, especially grapes which have a high percentage of sugar, add less honey. If you didn’t have that much fruit and it wasn’t really sweet fruit to begin with, add more honey. It’s that easy. If you want to be safe, add more honey. Often, if the wine turns out too sweet, I just let it sit and it levels out. If it’s not sweet enough, put it in a decanter with some honey for a day or so. If you like a sweeter wine, go nuts, add 4 cups of honey. Whatever––I’m trying to keep it simple, and if you’re only making a gallon at a time it’s not going to be a huge, time-consuming loss if you don’t love it…but I digress.) Next, cover the container with a t-shirt or cloth and tie a string around it to keep bugs out. Stir it hard for a few minutes every few hours. Keep in a warm place, 70 degrees or so. Top of the fridge usually works well.The next day, stir it every 4 hours or so, but don’t worry if you’re late or early, just stir it a few good times a day to keep mold spores submerged.It should, if you followed the steps as I wrote them, start bubbling on its own within 2 or 3 days. You don’t have to add yeast, I never have and it’s never failed––the yeasts should already be on the fruit and in the air. If not, we’re all in trouble. Keep stirring a few times a day and keep it covered. Once the bubbling slows down (about 3 days after it starts bubbling) strain the liquid gently (no worries if some solid mass comes through) and put it in your small-necked container or carboy. Put your airlock on, or just use a small balloon, and set it in a cool, dark place. If you use the balloon you will have to let the resulting gas (carbon dioxide) out occasionally by simply pulling the balloon off then replacing it frequently for the first week, less so after that.MAKE SURE NO BUGS GET IN, they want to spoil your wine and fun, keep it covered.Let the wine sit for as long as you want, but I recommend at least a month. If you made a sweeter wine I might recommend longer. Then? Bottle the wine and further age it or drink it immediately. Voila! That’s the basics, you can make it as complicated as you want, but I like it simple. For me, that’s often where the complexity comes from anyhow.GOOD LUCK –– and don't be afraid to experiment or ask questions!- Jesse.


